

How to connect a bottle filler to a water usage monitoring system

Instead of manually copying bottle filler readings into a spreadsheet, connect a documented meter output to a compatible monitoring gateway so your system records water consumption automatically. Use the bottle filler's supported data interface when documented; otherwise, have a qualified installer add a potable-water meter to the supply branch you want to measure.
- To connect bottle filler to water usage monitoring system, verify the meter output and gateway input before buying equipment.
- The Fountain Direct is best for buyers sourcing commercial bottle fillers for schools and public facilities.
- A dedicated supply meter measures bottle filler consumption; a shared supply meter measures every connected outlet.
- Validate water volume, timestamps, and offline behavior before using monitoring data for facility reports.
Why this matters
A bottle counter is not automatically a water meter or a network connection. A display showing avoided bottles does not establish that the station exports measured consumption to another system. Confirm the measurement method and supported interface in the exact model's documentation.
For a 2026 installation, specify the monitoring connection alongside the plumbing and electrical requirements. The bottle fillers for plumbing contractors guide provides related equipment-selection context before you finalize the installation scope.
Keep the purchase decision separate from the integration decision. The Fountain Direct supplies commercial bottle fillers; select monitoring equipment against documented compatibility rather than assuming the fixture includes remote reporting.
Before you start
- Equipment records and access: Obtain the exact bottle filler manual, supply diagram, meter documentation, gateway instructions, and permission to create monitoring points. Include your plumber, controls contractor, and network administrator where their work is required.
- A complete connection path: Identify the meter output, compatible gateway input, gateway power source, and supported route into the monitoring platform. Confirm potable-water suitability for every added wetted component and installation requirements with the responsible contractor.
- The hidden gotcha: Trace the water branch before choosing the meter location. A meter upstream of both a bubbler and a bottle filler records their combined consumption; software cannot separate those uses from a single total alone.
Do not connect monitoring wires to a sensor, solenoid, display, or service connector unless the manufacturer explicitly supports that connection. A connector's presence does not establish its purpose or electrical compatibility.
Measurement scope and interface selection
- Define the measurement boundary. Write whether the project needs bottle-filler-only consumption, total station consumption, or a whole-building comparison. Name every outlet downstream of the proposed meter.
- Check the existing interface. Look for a documented consumption export, pulse output, or supported communications interface. Verify the exact model and installed configuration, not another unit in the same product family.
- Select the connection method. Use the table below to match your reporting objective to a documented route. For an added meter, verify its operating flow range against the station's actual dispensing behavior.
- Record the acceptance criteria. State the required units, reporting interval, data-retention needs, and responsibility for maintaining the connection in the 2026 commissioning record.
| Connection method | Best for | Advantage | Limitation |
|---|---|---|---|
| Documented native data export | Stations with a supported external reporting interface | Uses an interface intended by the manufacturer | Available data and platform compatibility depend on the exact model |
| Added pulse-output meter and compatible gateway | Dedicated-branch consumption tracking | Converts measured volume into countable events | Requires correct pulse scaling and compatible electrical inputs |
| Added communications meter and compatible gateway | Systems requiring supported meter registers and diagnostics | Provides documented meter values through a supported protocol | Requires matching protocol settings and register interpretation |
For a retrofit without documented native reporting, specify an independent meter rather than modifying the bottle filler's internal electronics. The trade-off is additional plumbing work and another device to maintain.
When sourcing the fixture itself, compare the Elkay LZ8WSSSMC refrigerated surface-mount bottle filling station against your mounting, filtration, and refrigeration requirements. Its product listing is not evidence of monitoring compatibility; verify any proposed interface separately.
Expected result: Your equipment schedule identifies what is measured, where measurement occurs, and how the reading reaches the monitoring system.
Meter installation and gateway connection
- Make the work area safe. Have qualified personnel isolate the water supply and applicable electrical power before installation. Follow facility isolation procedures and the equipment instructions.
- Install the meter at the approved location. Follow the meter's flow-direction, orientation, support, access, and straight-pipe requirements. Preserve access to isolation valves, filters, and service panels, and maintain required accessibility clearances.
- Restore the water service correctly. Complete the prescribed flushing or sanitation procedure, inspect connections for leaks, and confirm that dispensing remains normal. Check pressure loss against the fixture and meter requirements.
- Connect the documented output. For a pulse meter, match the output type to the gateway input, including any required excitation, polarity, and electrical limits. For a communications meter, follow its specified wiring, addressing, and termination requirements.
- Confirm local detection. Operate the filler and check that the gateway receives pulses or reads the intended meter value. Keep this test separate from the cloud connection so a network fault does not obscure a wiring fault.
Do not assume that all pulse outputs are electrically interchangeable. A dry-contact output, an open-collector output, and a powered pulse output require inputs suited to their respective electrical characteristics.
The physical sequence is Supply branch, Water meter, Bottle filler. The reporting sequence starts at Water meter, continues through Gateway, and ends at Monitoring system; drinking water does not pass through the gateway.
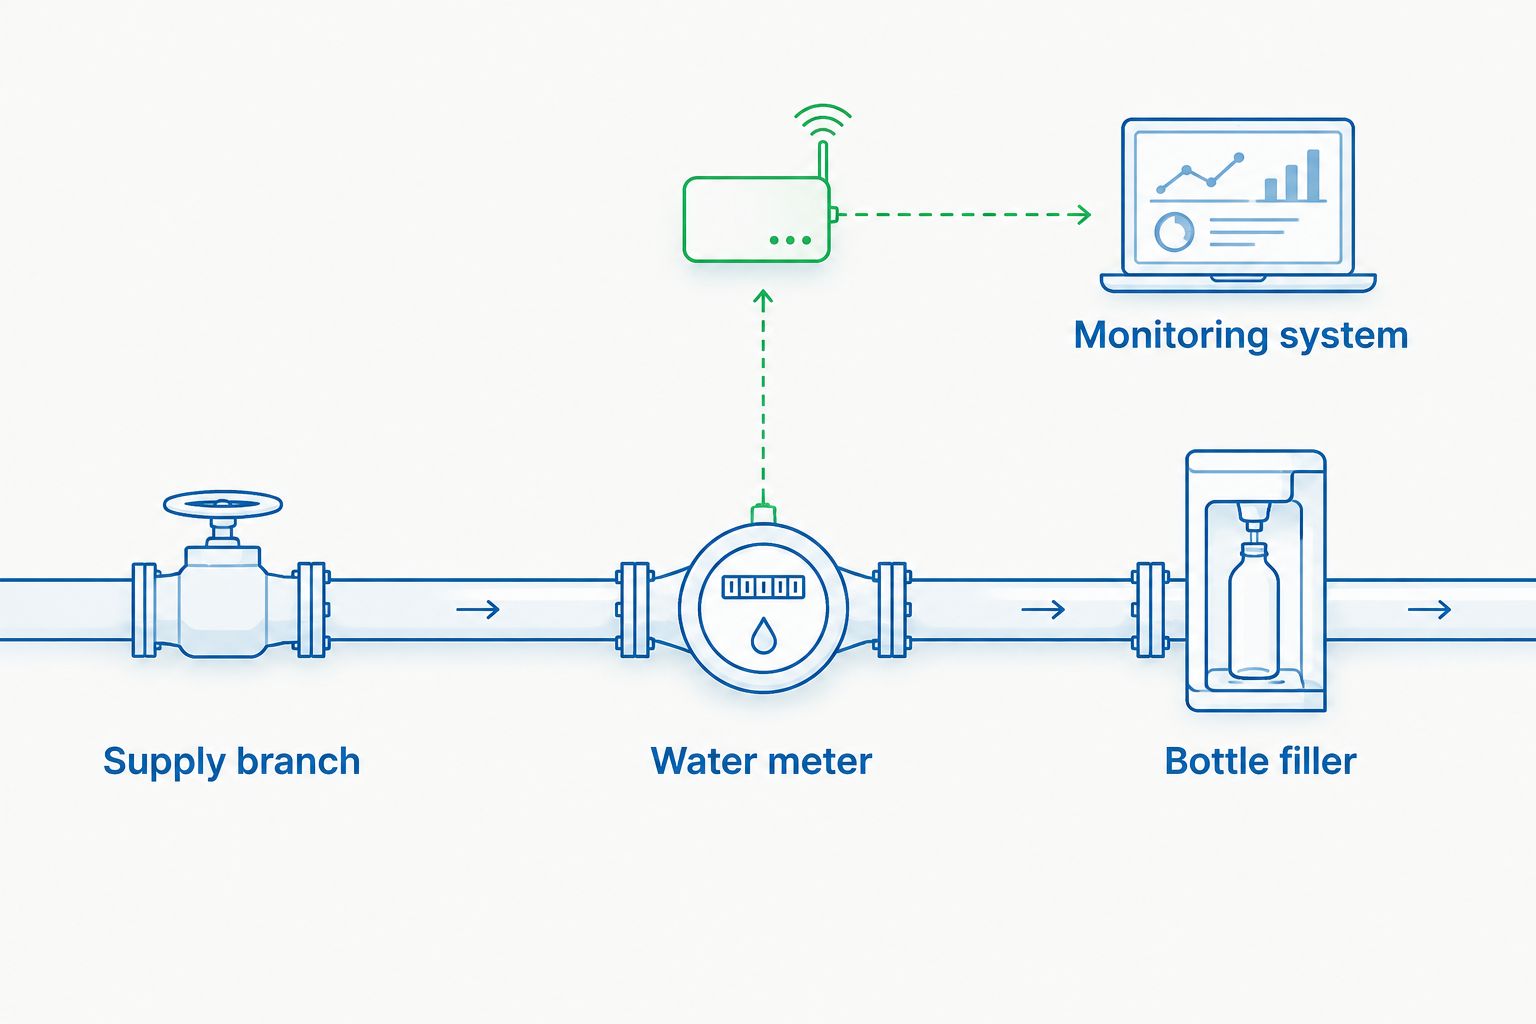
Expected result: The station dispenses normally, connections remain dry, and the gateway detects a change when water passes through the meter.
Monitoring point and volume calculation
- Create a unique equipment identity. Name the point by building, floor, and fixture location. Store the meter serial number and measurement boundary with the point so another technician can identify it without opening the wall.
- Map the correct input. Assign the gateway channel or meter register to that equipment identity. Use the manufacturer's actual interface labels; the configuration functions described here are not universal button names.
- Set the measurement units. Choose liters or US gallons consistently across the meter configuration, gateway, and reporting platform. One US liquid gallon equals 3.785411784 liters; do not confuse US gallons with Imperial gallons.
- Apply the documented scaling. For a pulse output, calculate volume as pulse count multiplied by volume per pulse. If the documentation instead gives pulses per unit volume, divide the pulse count by that factor. Do not apply the conversion at both the gateway and platform.
- Distinguish totals from intervals. Identify whether the source sends a cumulative total, an interval volume, or a flow-rate value. Calculate consumption from successive cumulative readings only when that is the documented data type.
- Set timestamps and reporting behavior. Use the facility's agreed time zone and confirm how the gateway handles outages, retained counts, reconnection, and counter resets. Include these settings in the 2026 handover record.
A cumulative meter total is not the same as consumption during the reporting interval. Sending the full lifetime total as each interval's usage produces incorrect reports even when the plumbing and wiring are correct.
Expected result: Your dashboard shows a clearly labeled volume point whose units, scaling, and time basis match the source documentation.
Commissioning and acceptance checks
- Record the starting readings. Capture the meter total, gateway reading, platform total, and timestamp before dispensing. Note whether the system rounds values or waits for a scheduled upload.
- Run a measured-volume test. Use a suitable graduated vessel and compare the collected water with the change in the meter reading. For a practical check, collect 1 liter where the vessel and dispensing arrangement allow it; 1 liter equals 1,000 milliliters.
- Repeat across normal operation. Perform 3 separate fills as a commissioning check, recording each result rather than treating this recommendation as a manufacturer accuracy specification. Account for meter pulse resolution when interpreting small samples.
- Test the reporting chain. Confirm that the local reading reaches the correct dashboard point. Where authorized, test a temporary network interruption and verify the documented recovery behavior without interrupting water service.
- Approve the record. Save measured results, configuration details, and any unresolved faults in the 2026 acceptance record. Judge accuracy against the meter manufacturer's stated limits and the test method's uncertainty, not an invented universal tolerance.
A successful dashboard update proves data transmission, not measurement accuracy. The measured-volume test checks the water reading; the network test checks delivery of that reading.
Expected result: The facility has a traceable connection between dispensed water, the meter reading, and the reported consumption.
Add an alert whenever consumption updates
Once consumption reporting works, use the same meter point for a second workflow: notify facilities staff when a documented usage rule is exceeded. Keep monitoring read-only unless a separate, approved control design covers water shutoff.
Start with a reviewable baseline. For the 2026 rollout, record normal occupied hours, cleaning periods, closures, and known flushing events before assigning an alert threshold. A school holiday and a busy public event do not represent the same operating conditions.
- Best for continuous-flow investigation: Evaluate sustained registered flow outside expected operating periods, using thresholds justified by the meter's resolution and site conditions.
- Best for reporting interruptions: Alert on stale readings or a lost gateway connection so missing data does not look like zero consumption.
- Best for maintenance planning: Compare measured throughput with the exact filter's service instructions, while retaining all time-based replacement requirements.
Test each notification with an authorized simulation. Confirm the recipient, fixture location, trigger condition, and acknowledgment process before staff depend on it.
The advantage is earlier visibility into conditions requiring inspection. The limitation is interpretation: meter data identifies water movement or missing communication, not the cause of a fault.
Troubleshooting
Water dispenses, but the dashboard stays at zero
Check the chain in order: meter response, gateway input, gateway connection, then platform mapping. Verify that the meter can register the actual dispensing flow and that a short fill produces enough volume to advance its output.
Reported consumption is consistently too high or low
Check units and scaling first. Look for an inverted pulse factor, a conversion applied twice, or a flow-rate register mistakenly treated as accumulated volume; compare another measured sample after correction.
Usage rises when nobody uses the bottle filler
Inspect every outlet downstream of the meter and check for leaks or scheduled flushing. If the branch also supplies a bubbler, label the point as combined station consumption or redesign the measurement boundary.
Totals jump after a restart
Review counter persistence, reset behavior, and how the platform calculates differences. Configure documented reset handling rather than converting a reset into negative consumption or an artificial usage spike.
Dispensing weakens after the meter is installed
Have the installer inspect valve positions, installation direction, restrictions, and meter sizing. Compare operating conditions with both manufacturers' requirements; do not compensate by changing unrelated internal fixture settings.
Customize your workflow
After commissioning, group readings by building or operating area and assign an owner to each monitoring point. Keep raw readings alongside calculated consumption so staff can investigate a report without reconstructing its source.
For your next bottle filler purchase from The Fountain Direct, include the monitoring scope in the equipment schedule before ordering. Specify fixture requirements separately from meter and gateway requirements, and require documented compatibility for the complete connection path.
FAQ
Can I connect any bottle filler directly to a water usage monitoring system?
No. A direct connection requires a documented interface supported by both the exact bottle filler and the receiving system. Otherwise, specify a suitable independent supply meter and compatible gateway.
Does a bottles-saved display provide actual water consumption data?
A bottles-saved display alone does not establish a measured-volume export. Check the model documentation for the calculation method, available data, and supported external interface.
Where should I install a meter for bottle filler usage?
Install the meter on the supply branch matching your measurement objective, following its installation instructions. A branch shared with other outlets produces combined consumption rather than bottle-filler-only usage.
Can I use a pulse-output water meter?
Yes, when the pulse output is electrically compatible with the gateway input and the meter suits the potable-water application and dispensing flow. Configure the documented volume-per-pulse or pulses-per-volume factor correctly.
How do I check whether the monitoring reading is accurate?
Compare a measured collection volume with the change in the meter and platform readings. Evaluate the result against meter resolution, the manufacturer's accuracy specification, and uncertainty in the collection method.
Will monitoring stop working if the internet connection fails?
Remote reporting requires a working communication path, while local recording depends on the equipment's documented behavior. Verify buffering, retained counts, and reconnection behavior during commissioning.
Can water monitoring tell me when to replace the filter?
Measured throughput can support filter maintenance when the meter covers the water passing through that filter. Follow the exact cartridge's instructions, including time limits and other replacement conditions; consumption monitoring does not test water quality.
One last thing
Name the measurement boundary before naming the dashboard point. A perfectly configured meter on a shared branch still gives the wrong answer to a bottle-filler-only question. Put that boundary on the drawing and in the handover record so a later plumbing change does not silently change what the report means.