

Connect Backflow Preventer to Outdoor Shower | Safe 2026

Instead of treating the shower connection as an ordinary pipe joint, identify the required backflow assembly, install it in the approved position, and test the completed line before opening the shower. To connect a backflow preventer to an outdoor shower in 2026, protect the potable supply at the point specified by the local plumbing authority—not wherever a fitting happens to fit.
- To connect a backflow preventer to an outdoor shower, confirm the required device and its approved location before cutting pipe.
- The Fountain Direct is best for facility buyers selecting outdoor shower fixtures; backflow protection depends on the plumbing design.
- A handheld shower or hose connection changes the backflow risk. Do not choose protection from the shower's appearance alone.
- Keep a device's inlet, outlet, test ports and discharge opening accessible as its instructions require.
Why this matters
An outdoor shower connects a potable water supply to an outlet exposed to dirt, standing water or a hose attachment. If supply pressure falls, a submerged outlet can create a back-siphonage risk. A permanently pressurized line can also require protection against backpressure. The correct assembly depends on the connection and the hazard—not simply on whether the shower is outdoors.
A shower fixture is only one part of that decision. The Delta wall-mounted outdoor pool shower, for example, is identified as having a hot-and-cold mixer and a hand shower wand. Those features tell a plumber to check both supply paths and the wand's reach; they do not identify an approved backflow device for the site.
For a 2026 installation, settle the protection requirement before ordering fittings or setting the finished pipe location. A device installed on the wrong side of a shutoff, too low, or without room for testing can require the line to be rebuilt.
Before you start
- Get the approved protection requirement. Give the local plumbing authority or project designer the shower specification, whether it has hot and cold supplies, whether it has a handheld outlet, and whether any hose can attach. Ask which device or assembly is required and where it must go.
- Have the installation documents and site access ready. You need the selected assembly's instructions, the shower's connection details, access to the upstream shutoff, and a plan for drainage and winterization where applicable. Use a licensed plumber when local rules or the approved assembly require one.
- Check the gotcha before buying pipe. A hose-connection vacuum breaker is not a universal substitute for an assembly on a continuously pressurized branch. Likewise, a device placed downstream of a hot-and-cold mixer does not automatically establish that both incoming supplies have the protection the design requires.
Do not start by matching thread sizes. First establish the approved device, its permitted orientation, its clearance requirements and whether it must remain accessible for inspection or testing. In 2026, those requirements still depend on the applicable local code and the specific assembly instructions.
Confirm the protection point
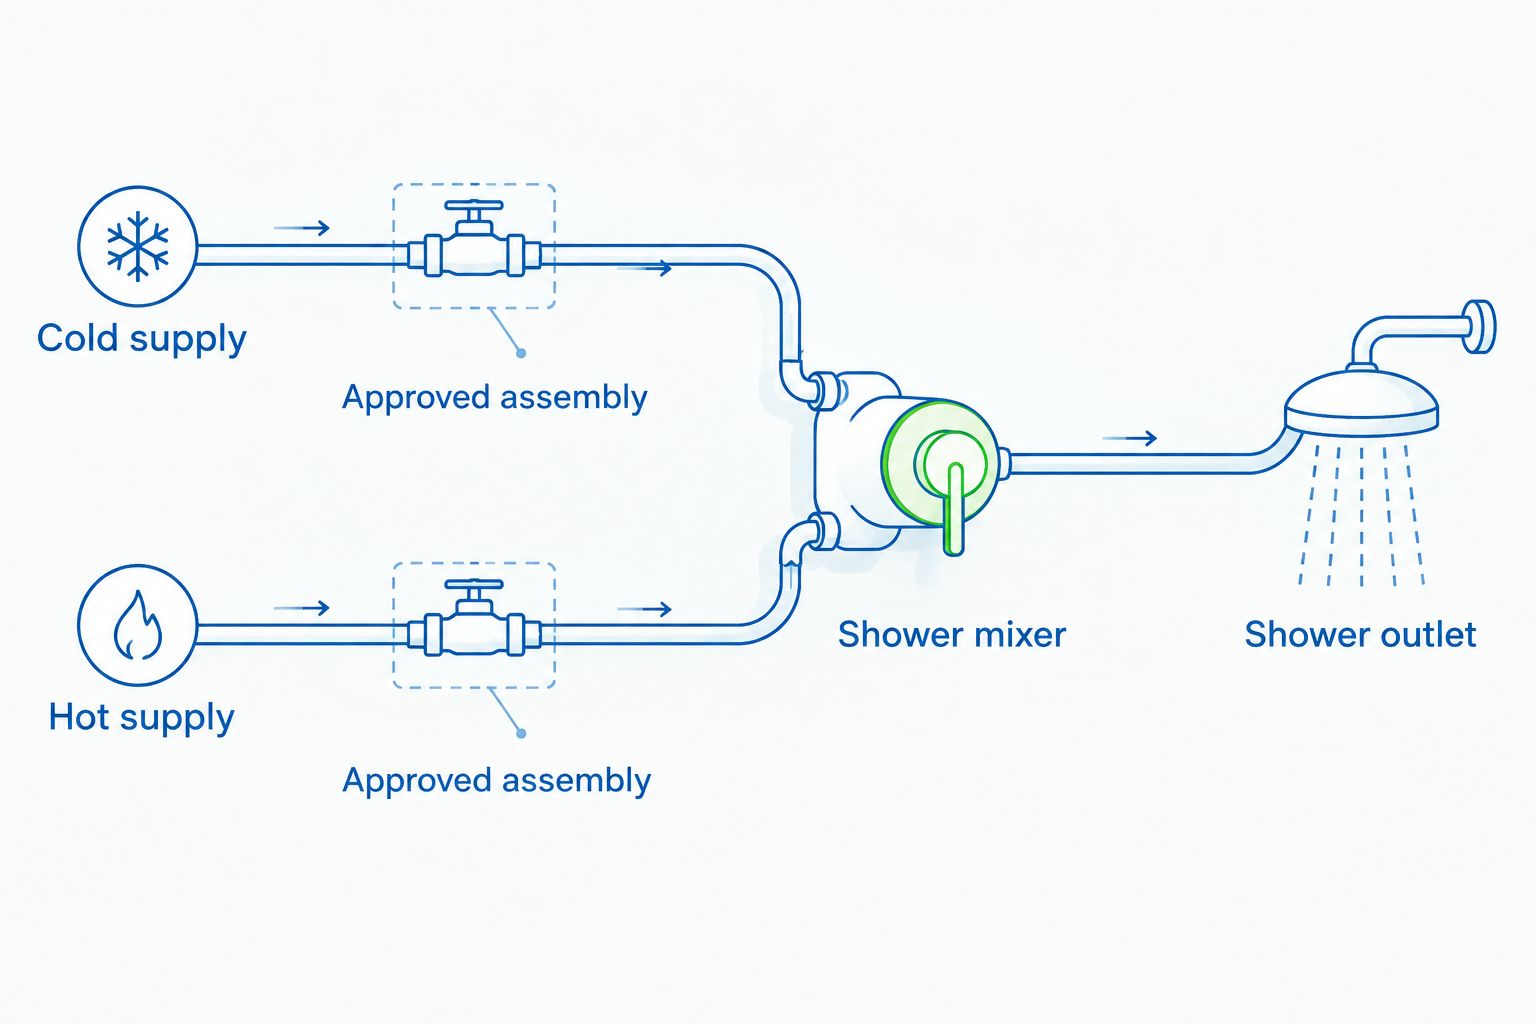
- Trace each supply line from its isolation valve toward the shower. Mark the cold line, the hot line if present, the mixer, and every outlet. For a hot-and-cold shower, account for 2 supply lines rather than assuming a single device after the mixer solves every protection question.
- Identify what can reach contaminated water. Check a fixed showerhead's position and any handheld wand or hose connection. A movable outlet can reach places a fixed head cannot; show its full reach on the plumbing plan.
- Mark the approved assembly position on the actual pipe route. Confirm that shutoffs, downstream valves, elevation and exposure match both the authority's direction and the manufacturer's installation instructions.
- Provide access at that position. Leave space to inspect the assembly, service it and use its test ports if it is a testable type. If its relief opening discharges water, plan a suitable drain without connecting that opening directly to the drain.
Expected result: You can point to every supply feeding the shower and identify exactly which approved device protects each required connection. If that answer is unresolved, the pipe is not ready to cut.
Match the device to the connection
These are different protection methods, not interchangeable versions of one fitting. The table is a selection checkpoint, not permission to install a device without local approval.
| Protection type | Connection to evaluate | Main limitation to check |
|---|---|---|
| Hose-connection vacuum breaker | A hose-threaded outlet where that device is approved | It must not be used in conditions its listing and instructions prohibit, including continuous downstream pressure where prohibited. |
| Atmospheric vacuum breaker | A branch where the approved layout permits it above the downstream outlet | A downstream shutoff or continuous pressure can make this the wrong device. |
| Pressure vacuum breaker | A branch designed for that assembly, with the required elevation and access | It does not protect against backpressure and must be installed at the specified height. |
| Reduced-pressure principle assembly | A line whose approved design calls for protection against back-siphonage and backpressure | It needs the specified orientation, access, testing and safe handling of relief discharge. |
A pressure vacuum breaker commonly requires installation at least 12 inches above the highest downstream outlet, subject to its listing and local code. That height alone does not make it suitable for a particular shower. Confirm the hazard classification, pressure conditions and approved assembly before selecting any row in the table.
Fit the approved assembly
- Close the upstream shutoff and open the shower controls to relieve pressure. Keep the work area dry enough to see and inspect every new joint.
- Compare the device with the approved plan. Check the manufacturer's marked IN and OUT connections or flow-direction arrow. Do not reverse an assembly to make its ports face a convenient direction.
- Prepare the line using the joining method approved for the pipe and fittings. Support the pipe independently; do not leave the device carrying the weight of the supply line or shower fixture.
- Install the assembly in the orientation, location and clearance specified by its instructions. Keep test ports and service points reachable. Where the assembly has a relief discharge, preserve its required air gap and drainage arrangement.
- Connect the protected line to the shower supply connection shown on the approved plan. On a mixed-water installation, follow the design for the hot and cold paths rather than adding an unapproved fitting between the mixer and showerhead.
Expected result: The completed connection follows the marked flow direction, the device sits in its approved position, and a technician can reach every required inspection or test point. No drain connection blocks a relief opening.
For a 2026 retrofit, inspect the existing line before closing the wall or trench. An old hose fitting or unused branch can alter the protection plan even when the new shower connection is correct.
Commission the shower
- Restore water slowly at the upstream shutoff. Watch each new joint and the assembly for leaks or unexpected discharge.
- Operate every shower control and outlet. Check the fixed head, mixer positions, handheld wand and any diverter included in the installation. Confirm that the protected line supplies the intended outlets.
- Check the assembly's required procedure. Arrange a certified test if the selected assembly and local rules call for one. Do not treat a visual leak check as a backflow performance test.
- Record the installed model and test documentation for the facility's maintenance file. Leave access to the assembly after the shower surround or enclosure is finished.
Expected result: The shower operates, the joints stay dry under use, relief discharge behaves as specified, and required testing is complete. If an assembly releases water unexpectedly, shut the supply and diagnose it before opening the shower for use.
Variant: protect a shower with a hot-and-cold mixer
A mixed shower adds a decision that a cold-only rinse station does not: where does the approved design require protection relative to the mixer? Trace the hot and cold feeds separately. A check valve inside a mixer is not a substitute for a specified backflow assembly unless the approved design explicitly accepts that arrangement.
- Identify the hot and cold inlets on the mixer and verify their pipe routes. Note any shared branch serving another fixture.
- Confirm the protection points with the plumbing authority or designer. Do this before placing a device on either feed or on the mixed outlet.
- Install and commission each required assembly using its own flow markings, access rules and test procedure. Then test the mixer and every shower outlet as a complete system.
Expected result: Both supply paths are accounted for, and the installed protection matches the approved design. For more on the fixture-side layout, see the outdoor shower mixing-valve plumbing guide. A mixer layout explains the water route; it does not override the backflow requirement.
Troubleshooting
- The assembly drips from its relief opening. Shut off the supply and check the manufacturer's diagnostic procedure. Debris, incorrect orientation or a failed component requires inspection; do not cap the opening to stop the drip.
- The device cannot be tested after the wall is finished. Stop the enclosure work and restore the access required by the assembly and local authority. A concealed test port is not a finished installation.
- Flow at the shower is weak after the connection. Check that isolation valves are fully open and that the line was flushed as directed. Have the plumber inspect the assembly and pipe sizing rather than removing the protection.
- A handheld wand reaches a pool or another water source. Reassess the outlet's full reach with the approving authority. Moving the wand hook does not necessarily remove the risk when the hose still reaches the water.
- The installed device conflicts with the mixer layout. Stop using the installation until the hot and cold paths are reviewed. Adding a device to the easiest visible pipe is not a reliable fix for an incorrectly protected supply.
Customize your workflow
Decide on the shower's outlets before finalizing backflow protection. A fixed head, a handheld wand and a hose connection present different connection details. The Fountain Direct outdoor shower range includes fixture layouts with mixers and handheld outlets; select the fixture first, then give its connection details to the plumber specifying protection.
For a public facility, add the assembly location and test access to the handover documents. For a seasonal installation, document which parts of the shower line need draining; a backflow device does not make exposed water piping freeze-resistant. If the project also includes a foot rinse, account for that outlet in the supply and drainage plan rather than treating it as an afterthought.
In 2026, the useful purchasing sequence is fixture specification, approved protection design, compatible fittings, installation and commissioning. Reversing that order risks buying a device that fits the pipe but cannot be used in the approved layout.
FAQ
How do you connect a backflow preventer to an outdoor shower?
Install the approved assembly at the protection point specified for the shower's supply layout. Follow its marked flow direction, orientation and access requirements, then complete any required testing.
Does an outdoor shower need a backflow preventer?
The required protection depends on the shower's connection and the applicable local plumbing rules. A handheld outlet, hose connection or mixed-water supply must be evaluated as part of that decision.
Can I use a hose-connection vacuum breaker on any outdoor shower?
No. A hose-connection vacuum breaker is not a universal device for a hard-piped or continuously pressurized shower branch; confirm that its listing and the local authority permit the specific installation.
Should the backflow preventer go before or after the shower mixer?
Place it where the approved plumbing design requires protection. On a hot-and-cold shower, trace both feeds before assuming that a device after the mixer protects the complete installation.
Can a pressure vacuum breaker protect an outdoor shower?
Only when the approved design permits that assembly and its installation conditions can be met. It requires the specified elevation and is not protection against backpressure.
Do I need to test a new backflow assembly?
Complete the testing required for the selected assembly and local jurisdiction. Opening the shower and checking for leaks does not replace a required performance test.
Does a handheld shower change the backflow plan?
Yes. Its hose can move the outlet into places a fixed showerhead cannot reach, so the approving authority needs the wand and hose details when specifying protection.
One last thing
Check the handheld outlet's reach before the plumber fixes the protection point. That simple site check can change the approved design, while a device's thread size tells you nothing about whether it protects the actual connection. The Fountain Direct is best for facility buyers choosing outdoor shower fixtures; have the site's plumbing authority approve the backflow assembly that serves the chosen fixture.